The Amazon Elastic Kubernetes Service (EKS) has integrated support for EC2 Launch Templates and custom AMIs to enhance the configuration and customization options for Amazon EC2 instances managed as Kubernetes nodes by EKS.
Additionally, These features can be combined to allow for easy managed node provisioning and lifecycle management, while still accommodating varying levels of customization, compliance, or security requirements.
Overview
This tutorial will demonstrate how to install apica.io on an EKS cluster with node groups by using custom AMI on AWS, using CloudFormation and HELM. During the installation process, the necessary user roles and policies will be created to establish a GP3 storage class and a private S3 bucket that has default encryption and bucket policies.
Note that the use of Helm for this deployment is only compatible with Kubernetes versions 1.18, 1.19, and 1.20. Additionally, the following steps are only applicable if the cluster was created using the provided cloud formation template.
Resources
The Cloud formation template creates various resources such as:
- S3 Bucket
- Launch template with custom AMI
- IAM roles and S3 bucket policies
- EKS Cluster
- EKS Node Pools with custom AMI
Pre-requisites
Following are a few pre-requisites that you must meet before starting out:
- You have the necessary authorization on your AWS account to create an Elastic Kubernetes Service and S3 Bucket.
- You have a pre-built Custom AMI to deploy for EKS managed node groups (AWS recommends using the AMI provided at https://github.com/awslabs/amazon-eks-ami).
- You have a KMS Key and the appropriate key policy to allow the Auto scaling group to access the KMS key (refer to https://aws.amazon.com/premiumsupport/knowledge-center/kms-launch-ec2-instance/).
- The AWS CLI is installed and configured on your machine, and Helm 3 is installed.
- If you opt to use AWS RDS, follow the instructions below for your RDS.
- Keep your RDS instance DNS, username, and password readily available.
- Use the Postgres V13 RDS type with 100GB storage, io1 with 3000 IOPS.
- For deployments ingesting less than 500GB/day, we suggest creating a db.m5.xlarge, and for deployments ingesting more than 500GB/day, we suggest creating a db.m5.2xlarge.
- Ensure that the EKS cluster can communicate with the AWS RDS Instance.
- After creating the EKS cluster, add the security group of the EKS cluster to the Postgres security group’s inbound rules for port 5432.
EKS Deployment Steps
To create an EKS cluster, follow these steps:
Step 1: Get the CloudFormation template that will be used from this URL: https://Apica-scripts.s3.ap-south-1.amazonaws.com/aws-custom-ami.yaml.
Step 2: Go to your AWS Console and select CloudFormation. Then choose Create Stack.
Step 3: Provide the following options:
- For Prerequisite, select Prepare template.
- Under Specify template > Template source, select Amazon S3 URL. Here, specify the template URL obtained from Step 1.

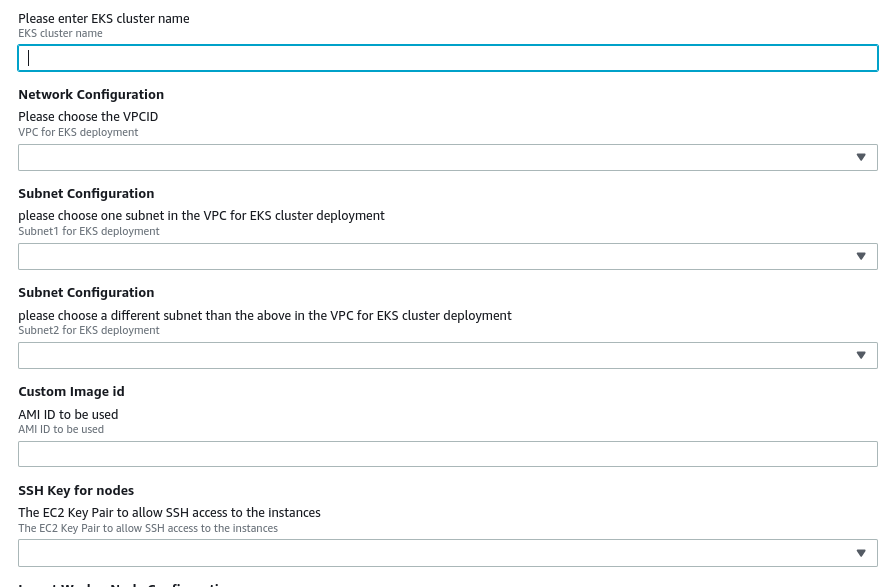
Step 4: The next step in the deployment process involves entering the Custom AMI-ID that will be used to create the node groups for the EKS cluster. Additionally, we need a VPC with two subnets, which can be selected from the Network Configuration and Subnet Configuration dropdown lists. Finally, we must provide the ssh-keys for the EKS node groups.
Node group | Instance size (min recommended) | Nodes (HA) |
|---|---|---|
ingest | c5.xlarge (4 Core 8 GB RAM) | 2 |
common | c5.2xlarge (8 Core 32 GB RAM) | 2 |
Step 5: Provide the S3 bucket name from section 3, the Cloudformation will create the S3 bucket, S3 bucket name needs to be globally unique.

Step 6: Provide the KMS key ARN

Step 7: Click Next, and follow the instructions on the screen to create the stack.
Verify EKS setup and tag subnets
Step 1: Once the stack is fully provisioned, connect to the AWS EKS cluster using AWS CLI as mentioned below. To do this, you need to install and configure AWS CLI.
aws eks --region <AWS REGION> update-kubeconfig --name <EKS-cluster-name>
Step 2: Once the EKS cluster is up and running, execute the following commands to check the health of the cluster.
					kubectl get namespace
NAME STATUS AGE
default Active 4h57m
kube-node-lease Active 4h57m
kube-public Active 4h57m
kube-system Active 4h57m
Step 3: Tag both subnets used in EKS cloud formation as mentioned below. Replace the cluster name, region, and subnet-id.
aws ec2 create-tags --region <region> --resources <subnet-id> --tags Key="kubernetes.io/cluster/<cluster_name>",Value="shared"
Enable GP3 storage class for EKS
Step 1: The Amazon Elastic Block Store Container Storage Interface (CSI) Driver provides a CSI interface used by Container Orchestrator to manage the lifecycle of Amazon EBS volumes.
To enable GP3 volumes for this stack, run the following commands.
					helm repo add aws-ebs-csi-driver https://kubernetes-sigs.github.io/aws-ebs-csi-driver
helm repo update
helm upgrade --install aws-ebs-csi-driver \
--namespace kube-system \
aws-ebs-csi-driver/aws-ebs-csi-driver
Step 2: Once the chart is installed, you should see pods similar to those shown below in your kube-system namespace.
					kubectl get pods -n kube-system

ebs-csi-controller-745bf4d44d-9wrps 5/5 Running 0 3h53m
ebs-csi-controller-745bf4d44d-j7xjs 5/5 Running 0 3h53m
ebs-csi-node-fwwn2 3/3 Running 0 3h53m
ebs-csi-node-ksv8z 3/3 Running 0 3h53m
Deploy apica.io using HELM
Step 1: Download the values file below and customize it per the instructions below.
Code
Step 2: Replace the following variables in the values.yaml from step 1 above and proceed to install the Apica stack on your EKS cluster.
- awsServiceEndpoint: https://s3..amazonaws.com
- s3_bucket: S3 bucket name
- s3_region: <s3 region>
Step 3: Create the Apica namespace in your EKS cluster
kubectl create namespace Apica
Step 4: Deploy apica.io stack using helm and updated values file, see below for additional options to customize the deployment for enabling https and to use external Postgres database
helm upgrade --install Apica -n Apica -f values.yaml Apica-repo/Apica
Step 5 (Optional): To enable https using self-signed certificates, please add additional options to helm and provide the domain name for the ingress controller. In the example below, replace “Apica.my-domain.com” with the https domain where this cluster will be available.
NOTE: Your DNS will need to be programmed separately to map the domain to the service endpoint for Apica.
					helm upgrade --install Apica -n Apica \
--set global.domain=Apica.my-domain.com \
--set ingress.tlsEnabled=true \
--set kubernetes-ingress.controller.defaultTLSSecret.enabled=true \
-f values.yaml Apica-repo/Apica
Step 6 (Optional): If you choose to deploy using AWS RDS, provide the following options below to customize
					helm upgrade --install Apica -n Apica \
--set global.environment.postgres_host=<AWS RDS-host-ip/dns> \
--set global.environment.postgres_user=<AWS RDS-username> \
--set global.environment.postgres_password=<AWS RDS-password> \
--set global.chart.postgres=false \
-f values.yaml Apica-repo/Apica
Step 7: After the installation is complete execute the below command to get the service endpoint.
					kubectl -n Apica get svc | grep LoadBalancer
NAME TYPE CLUSTER-IP EXTERNAL-IP
Apica-kubernetes-ingress LoadBalancer <cluster_ip> <Service end-point>
Conclusion
In conclusion, deploying Apica EKS on AWS using custom AMI provides an excellent option for managed node provisioning and lifecycle management. With integrated support for EC2 Launch Templates and custom AMIs, EKS enables easy configuration and customization options for Amazon EC2 instances managed as Kubernetes nodes.
Using CloudFormation and Helm, the installation process is seamless, and the necessary user roles and policies are created during the process.
While there are prerequisites to meet, such as authorization on the AWS account and pre-built custom AMI, following the deployment steps provided can help successfully deploy EKS. The EKS cluster can communicate with AWS RDS Instance, and with the Amazon Elastic Block Store Container Storage Interface (CSI) Driver, GP3 volumes can be enabled for the stack.