In a previous article, we showed you how to deploy your favourite application on MicroK8s using a Helm chart. In that article, we used the Apica Helm chart as the example application we were deploying on MicroK8s. This article will take an in-depth look at how we deploy Apica for our customers on MicroK8s, mapped to a custom domain and with HTTPS enabled.
Our typical deployment of Apica on MicroK8s includes the following steps.
- Installing MicroK8s
- Enabling add-ons
- Creating the
Apicanamespace - Assigning wildcard certificates and your custom domain
- Installing Apica on MicroK8s
- Enabling and configuring ingress
Let’s begin.
Installing MicroK8s
We’re sure you already know, MicroK8s is a lightweight, pure-upstream Kubernetes aiming to reduce entry barriers for K8s and cloud-native application development. We love MicroK8s because of how quickly it lets us deploy a standalone Kubernetes cluster and install Apica on it in literally under 2 minutes.
The first step of our deployment is to install MicroK8s. To install MicroK8s, run the following commands.
sudo apt-get -y update
sudo snap install core
sudo snap install microk8s --classic
sudo usermod -a -G microk8s $USER
sudo chown -f -R $USER ~/.kube
sudo microk8s config > ~/.kube/config
You can check whether MicroK8s is up and running or not with the command:
sudo microk8s statusEnabling add-ons
The next step is to enable all the add-ons we need to support our Apica installation. The add-ons we’ll enable are Helm 3, DNS, ingress, storage, and private registry. These add-ons are pre-configured to work without any additional configuration and can be enabled and disabled at will.
Enable add-ons by running the following commands.
microk8s enable helm3
microk8s enable storage
microk8s enable dns
microk8s enable ingress
microk8s enable registry
microk8s.kubectl config view > $HOME/.kube/config
Create the Apica namespace
Next, we create the Apica namespace by running the following command.
microk8s kubectl create ns ApicaAssigning wildcard certificates and your custom domain
You can provide your wildcard certificates to the MicroK8s cluster using Kubernetes Secrets. If you choose to skip this step, the Apica server automatically generates a CA certificate and a pair of client and server certificates for you to use.
Create a secret file named Apica-certs.yaml using the following template. Ensure that you replace the placeholder text in this template with your Base64-encoded secret files.
apiVersion: v1
kind: Secret
metadata:
  name: Apica-certs
type: Opaque
data:
  ca.crt: {{ .Files.Get "certs/ca.crt.b64" }}
  syslog.crt: {{ .Files.Get "certs/syslog.crt.b64" }}
  syslog.key: {{ .Files.Get "certs/syslog.key.b64" }}
We can now install this secret file in the Apica namespace by running the following command.
microk8s kubectl create -f filename.yaml -n ApicaInstalling Apica on MicroK8s
Now we’re ready to install Apica on the MicroK8s cluster we brought up. We first need to add the Helm repo since we’re using the Apica Helm chart to install Apica on MicroK8s. Run the following command.
helm repo add Apica-repo https://Apicaai.github.io/helm-chartsThe following command installs Apica and creates an S3 bucket for storing ingested logs using your AWS S3 credentials. Be sure to replace the placeholders in this command template with actual values.
helm install Apica --namespace Apica --set global.domain=<your-domain-name> \
--set ingress.tlsEnabled=true \
--set kubernetes-ingress.controller.defaultTLSSecret.enabled=true \
-- set global.chart.s3gateway=false \
--set global.environment.s3_bucket= <your-bucket-name> \
--set global.environment.awsServiceEndpoint=https://s3.us-east-1.amazonaws.com \
--set global.environment.s3_region=us-east-1 \
--set global.environment.AWS_ACCESS_KEY_ID=<your-aws-s3-access-key-id> \
--set global.environment.AWS_SECRET_ACCESS_KEY=<your-aws-s3-secret-access-key> \
--set kubernetes-ingress.controller.defaultTLSSecret.secret=<secret_name> \
--set global.persistence.storageClass=microk8s-hostpath Apica-repo/Apica
Enabling and configuring ingress
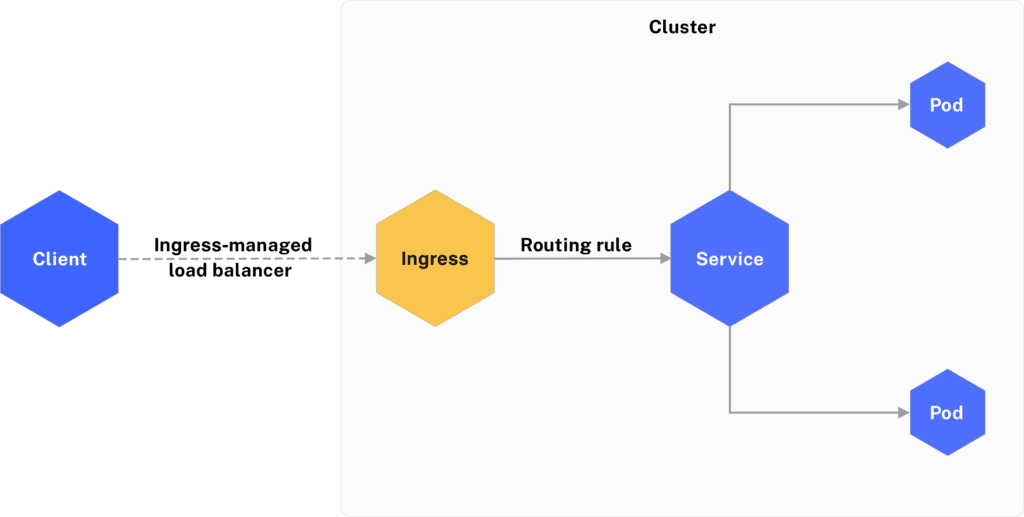
We’ve already enabled the ingress add-on for the MicroK8s cluster after we installed MicroK8s and brought up the cluster. The ingress add-on adds an NGINX ingress controller to your MicroK8s cluster. The ingress controller manages external access to the services in your MicroK8s cluster.
We now have to configure the ingress controller and its ports using a DaemonSet spec file. Use the following daemonset.yaml file template and update the placeholders with actual values for your cluster.
Important: When using the following template, ensure that you point the default SSL to the secret file we created in the previous step.
Now that we’ve set up the ingress controller, let’s put together a ConfigMap to store configurations for all the objects used in our cluster. Use the following ConfigMap template. Be sure to replace the placeholders with actual values for your cluster.
apiVersion: v1
data:
  "514": Apica/Apica-flash:514
  "24224": Apica/Apica-flash:24224
  "7514": Apica/Apica-flash:7514
  "20514": Apica/Apica-flash:20514
  "9998": Apica/Apica-flash:9998
  "9999": Apica/Apica-flash:9999
  "8081": Apica/Apica-flash:8081
  "24225": Apica/Apica-flash:24225
kind: ConfigMap
metadata:
  name: nginx-ingress-tcp-microk8s-conf
  namespace: ingress
  annotations:
    kubectl.kubernetes.io/last-applied-configuration: |
      {"apiVersion":"v1","kind":"ConfigMap","metadata":{"annotations":{},"name":"nginx-ingress-tcp-microk8s-conf","namespace":"ingress"}}
Our Apica deployment on MicroK8s is now ready to be accessed. Check the ingress controller on the Apica namespace to confirm whether the custom domain points to 127.0.0.1 by running the following command.
root@Apicaai-ami-1626692587-g-8vcpu-32gb-nyc3-01:~/flash-kubernetes/Apica# k get ingress -n Apica
NAME            CLASS    HOSTS               ADDRESS     PORTS     AGE
Apica-ingress   public   microk8s.apica.io   127.0.0.1   80, 443   63m
Your Apica deployment can now be accessed over HTTPS at the custom domain you configured.
Conclusion
As you can see with this deployment, it is very easy to deploy complex applications on MicroK8s using a Helm chart.


